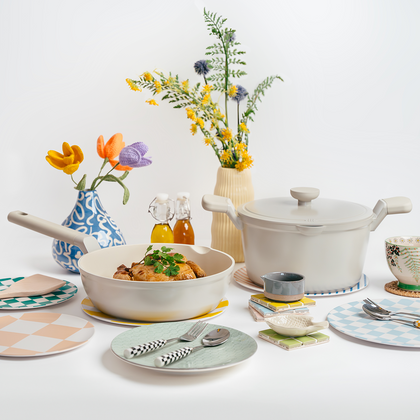
Who doesn't love a good party surrounded by loved ones sharing laughter and stories? Despite the joy that comes with hosting a gathering, it can often bring its fair share of stress. From planning menus to hours spent in the kitchen, it's easy to feel overwhelmed. However, our collection of easy-to-follow recipes is here to change that. Whether it's a formal dinner party, a laid-back game night, or a casual get-together, these dishes are designed to impress your guests effortlessly. So, let's simplify hosting and focus on what truly matters – cherishing the company of those we hold dear.
1. Charcuterie Board
A charcuterie board is a carefully curated selection of cured meats, cheeses, fruits, nuts, spreads, and accompaniments artfully arranged on a serving platter or wooden board. Typically served as an appetiser, charcuterie boards are a great and tasty addition to any gathering.

How To Assemble A Charcuterie Board:
- Start with the board. While charcuterie boards are commonly presented on a slate or wooden tray, don’t fret if you do not own one. A plate, cutting board, or even a baking sheet will serve just as well.
- Pick your cheeses. Introduce a variety of flavours and textures to your charcuterie board by selecting a range of cheeses from different families. Some recommendations can include Gouda, Brie and Feta cheese.
- Don’t forget your cured meats! No charcuterie board would be complete without its charcuterie. You might want to consider adding prosciutto, salami, chorizo, or mortadella to your spread.
- Incorporate your savoury components. Olives, pickles, roasted peppers, artichokes, almonds and cashews can bring a delicious and savoury touch.
- Include a touch of sweetness. Balance out the flavours with some seasonal and dried fruits, candied nuts, honey, or even chocolate.
- Offer a variety of bread and crackers. These not only complement the creamy texture of your cheese but also serve as a refreshing palate cleansers with a delightful crunch.
- Feeling fancy and want to amp up your charcuterie board? Simply add some edible flowers, fresh herbs, or additional fruits to create the perfect look and feel.
2. One-Pan Paella
Paella is a classic Spanish rice dish renowned for its rich flavours and vibrant colours. Featuring ingredients like saffron-infused rice, a variety of meats, seafood, and vegetables, paella offers a delicious and satisfying meal that's perfect for sharing with friends and family. Its communal serving style and customisable variations make it a popular choice for gatherings and celebrations around the world.
Ingredients:
¼ cup extra virgin olive oil
1 onion, diced
1 bell pepper, diced (½ red and ½ green)
4 garlic cloves
3 roma tomatoes, finely diced
(or 230g tomato sauce)
Bay leaf
1 Tsp paprika
1 pinch saffron threads
Salt and pepper
¼ cup white wine
4 boneless, skinless chicken thighs
¼ cup fresh chopped parsley
2 cups spanish rice
5 cups chicken broth
½ cup frozen peas
230g jumbo shrimp, peeled, tail on
230g Mussels (about 10-12), cleaned
250g calamari rings
Lemons, for garnish

How To Make One-Pan Paella:
- Begin by heating olive oil in a skillet over medium heat. Add in onions, bell peppers, and garlic, sautéing until the onions turn translucent. Toss in chopped tomatoes, bay leaf, paprika, saffron, salt, and pepper, stirring well and letting it cook for approximately 5 minutes.
- Pour in the white wine and allow it to simmer for about 10 minutes.
- Add chicken and rice to the skillet, along with chopped parsley, cooking for an additional minute.
- Slowly pour in the broth, ensuring it covers the mixture evenly. Do not stir from this point on. Bring the mixture to a boil before reducing the heat to medium-low. Give the pan a gentle shake once or twice during cooking.
- Let the paella cook uncovered for 15-18 minutes. Afterward, add the shrimp, mussels, calamari, and peas on top of the mixture. Continue cooking without stirring for an additional 5 minutes. Keep an eye out for most of the liquid to be absorbed and the rice at the top to become nearly tender. If necessary, add ¼ cup more water or broth and continue cooking.
- Once cooked, remove the pan from heat and cover it with a lid or aluminium foil. Allow it to rest for 10 minutes.
- Finally, garnish with fresh parsley and lemon slices before serving.
3. Quick, Pan-Seared Scallops
Looking to impress your guest? Pan-seared scallops are the perfect choice! Not only are they a rich source of protein but their exquisite presentation and sophisticated appearance add a touch of gourmet to any table. Plus, they’re a breeze to prepare and cook, ensuring you spend less time in the kitchen.
Ingredients:
-
Ingredients: (*2 servings entree, 4 servings appetiser)
454g scallops, fresh or frozen
2 Tbsp white wine vinegar
1 Tbsp lemon juice
1 Tbsp avocado oil
1 Tbsp shallots, minced
1 Tbsp fresh parsley, finely chopped
Salt + pepper, to taste

How To Make Pan-Seared Scallops:
Ensure scallops are thawed before beginning this recipe. Thaw them overnight in the refrigerator, or for a quicker thawing method, place scallops in their sealed bag in a bowl of cold water, fully submerging them for approximately 1 hour.
Pat the scallops dry with a paper towel and set them aside on a clean plate.
In a small bowl, mix together white wine, vinegar and lemon juice, and keep it handy near your stove.
Heat up some avocado oil in a large pan over medium-high heat. Once the pan is hot enough (it should sizzle when the scallops are added), carefully carefully add the scallops to the pan, making sure they're evenly spaced.
Cook them for about 2 minutes on each side until they turn opaque and develop a nice brown exterior. Depending on the size of your pan, you might need to cook the scallops in batches, transferring cooked scallops to a clean plate and adding more avocado oil between batches if necessary.
Once cooked, turn off the heat and return all scallops to the pan (if cooked in batches), quickly tossing them in the vinegar and lemon mixture.
Transfer them immediately to a serving bowl to prevent overcooking. Pour the vinegar sauce over the scallops, before generously seasoning them with salt and pepper. Top it off with diced shallots and chopped parsley, and serve hot.
4. One-Pan Steak with Beets and Crispy Kale
Who could possibly resist the allure of a perfectly cooked steak? From the moment it graces the table, its visually stunning presentation, adorned with vibrant colours and enticing textures, is sure to captivate your guests. Complemented by the rich flavours of tender steak, earthy beets, and crispy kale, this culinary masterpiece promises your guests a dining experience that is both refined and deeply gratifying.

Ingredients:
Four 250g beef tenderloin steaks
1 bunch kale, torn into bite-size pieces
1 bunch beets, peeled and thinly sliced
3½ Tbsp extra-virgin olive oil, divided
Salt and freshly ground black pepper, to taste
¼ Tsp dried Italian herb seasoning
How To Make One-Pan Steak with Beets and Crispy Kale:
Allow the steaks to come to room temperature for 15 to 20 minutes
Combine the kale and beets in a large bowl with 3 tablespoons of olive oil, before seasoning with salt and pepper.
Spread the beets and kale on a greased baking sheet. Brush each side of the steaks with ½ teaspoon of olive oil. Season both sides with salt, pepper, and Italian seasoning. Place the steaks directly on the baking sheet without covering any vegetables.
Adjust the top oven rack to the middle position and preheat the broiler on low. Place the baking sheet in the oven and broil for 2 to 3 minutes, then remove from the oven.
Flip the steaks over and broil for an additional 2 to 3 minutes (resulting in medium-rare steaks, tender beets, and crisp kale).
Take the baking sheet out of the oven and let the steaks rest for 5 minutes before serving. Evenly distribute the steaks and vegetables among four plates.
5. No-Bake Salted Caramel Cheesecake
One can never be too full for dessert. And when it comes to hosting and wowing your guests, a no-bake salted caramel cheesecake is an absolute game-changer. This delectable treat offers the perfect combination of sweet and salty, coupled with the smooth texture of the cheesecake, creating a tantalising sensory experience that will have everyone reaching for seconds.
Ingredients: (*8 - 10 servings)
250g digestive biscuits
125g unsalted butter, melted
2 Tbsp salted caramel sauce
750g full-fat soft cheese
2 Tbsp salted caramel sauce
3 Tbsp icing sugar
1 Tsp vanilla extract
3 Tbsp salted caramel sauce
Optional
20g chopped chocolate
Handful of chocolate-covered malted milk balls

How To Make No-Bake Salted Caramel Cheesecake:
Begin by crushing the digestive biscuits in a food processor until they form fine crumbs.
Add melted butter and caramel sauce to the crumbs and pulse again until the mixture becomes damp and sandy.
Transfer the mixture into a 20cm springform cake tin and use the back of a spoon to press it evenly into the base of the tin. Chill the base in the refrigerator for 30 minutes.
Prepare the filling by combining soft cheese, salted caramel sauce, sugar, and vanilla extract in a mixing bowl.
Once the base has cooled and firmed up, spoon the filling over it and use the back of the spoon to smooth the top. Chill the cheesecake in the refrigerator for at least 4 hours.
When ready to serve, carefully remove the cheesecake from the tin and place it on a serving platter.
Sprinkle shop-bought chocolates over the top, crushing a few malted milk balls if desired. Drizzle the cheesecake with salted caramel sauce before slicing into portions and serving.